
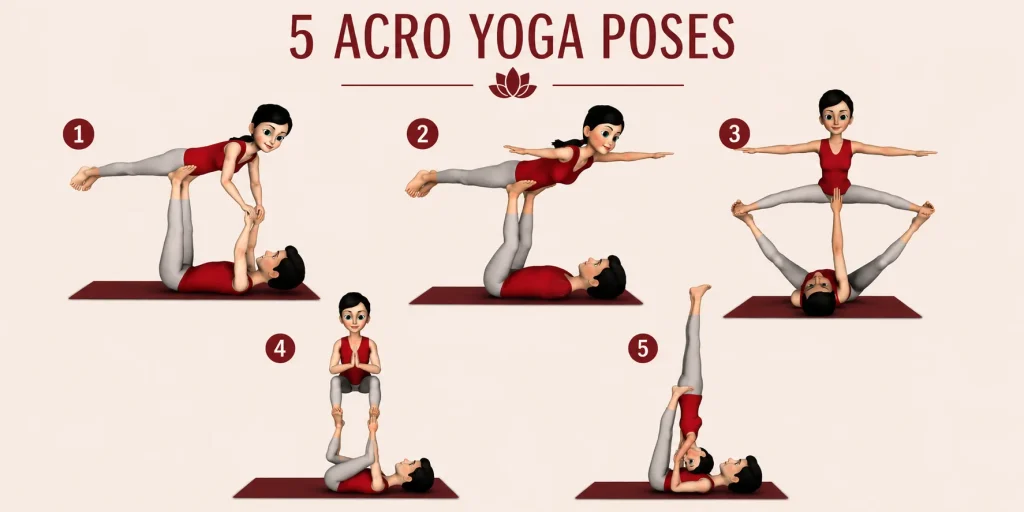
Acro yoga is a fantastic option for adding variety to your yoga practice!
Have you ever seen two people balance together in the air and thought — “I could never do that”? Well, here is the truth — you can. Acro yoga is not just for circus performers or advanced yogis. It is a beautiful, joyful, deeply connecting practice that any beginner can start learning — as long as they learn it the right way.
Acro yoga combines three ancient and modern traditions — Yoga, Acrobatics, and Thai Massage — into one practice that builds strength, trust, communication, and pure fun between partners. When you practice acro yoga, you are not just doing poses. You are learning to listen to another body, to support and be supported, to breathe together, and to move as one.
Before we dive into the 5 essential beginner poses, let us first understand the golden rules every new practitioner must know. These are not optional — these safety principles are what separate a joyful acro yoga session from an injury.
Before You Begin — 7 Golden Rules for Every Acro Yoga Beginner
1. Always Have a Spotter
In acro yoga, there are three roles — the Base (who lies on the ground and supports), the Flyer (who is elevated), and the Spotter (who stands nearby and keeps the flyer safe). As a beginner, never practice flying poses without a spotter. The spotter does not perform any acrobatic movements — their only job is to watch, catch, and protect. Think of the spotter as your safety net.
2. Warm Up Your Body First
Cold muscles and cold joints are the number one cause of acro yoga injuries. Before any session, spend at least 10–15 minutes warming up. Do simple sun salutations, hip circles, shoulder rotations, wrist stretches, and light hamstring stretches. The base especially needs to warm up their wrists, shoulders, and legs. The flyer needs open hips and a flexible spine.
3. Communication is Everything
In acro yoga, your voice is your most important tool. Before every pose, the base and flyer must discuss the plan. During the pose, use clear code words — most acro yoga communities use “Ready? Flying!” before lifting and a word like “Down” when someone wants to come out of the pose. If something hurts or feels unstable, speak immediately. Silence in acro yoga is dangerous.
4. Start Low, Stay Low
As a beginner, resist the temptation to jump into tall or inverted poses. The 5 poses in this guide are chosen specifically because they are low, safe, and foundational. Master these first. Height and complexity come naturally with practice and trust.
5. The Base Must Engage the Core — Always
The base is the foundation of everything. A weak base means an unstable flyer. The base must keep their core muscles strongly engaged throughout every pose. Think of your abdomen as a solid table — the flyer is a precious object resting on that table. If the table wobbles, everything falls.
6. Soft Knees, Bent Arms Are Your Enemy
This sounds counterintuitive, but in acro yoga — straight, stacked joints are safer than bent ones. The base’s arms and legs work like pillars. Bent arms tire out quickly and collapse unpredictably. When you stack bone on bone (straight arms, legs over hips), the skeleton does the weight-bearing work, not just the muscles. Learn to stack your joints.
7. Fall Safely — Practice This First
Before learning to fly, the flyer must learn to fall. Practice stepping off poses consciously. The spotter should practice catching a forward-falling flyer by stepping in from the side and supporting the flyer’s waist and upper body. A few minutes of fall practice before each session removes 80% of fear and 100% of your worst injuries.
The 3 Roles — Know Your Position
Before we go pose by pose, understand your role clearly:
The Base: You are the ground. You lie on your back, and with your hands and feet, you create a stable platform for the flyer. Your strength, calm, and stillness determine the quality of every pose. Experienced bases are patient, communicative, and incredibly strong in the core, shoulders, and legs.
The Flyer: You are the sky. You trust the base completely, maintain body awareness, stay engaged in your muscles (a limp flyer is harder to balance than an active one), and communicate any discomfort immediately. Good flyers are light in spirit, strong in their core, and flexible in their trust.
The Spotter: You are the guardian. Stand close. Stay alert. Never look at your phone. Your hands are ready to catch the flyer’s hips or upper body if they begin to fall. You also help the base and flyer enter and exit poses safely. The spotter is often the most experienced person in the trio.
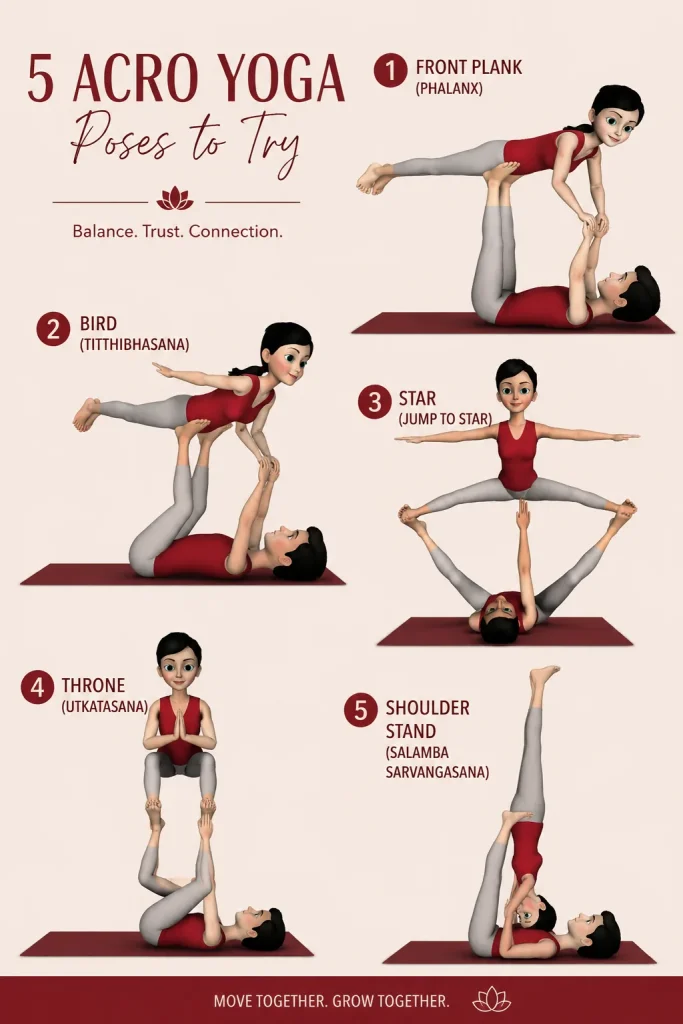
Pose 1 — Front Plank (Phalanx Pose)
What It Is: The Front Plank, sometimes called Phalanx, is the most foundational acro yoga pose and the perfect starting point for every beginner. The flyer balances horizontally above the base, chest facing down, held by the base’s hands and feet. It mimics a plank position — but in mid-air.
Why Beginners Should Start Here: This pose teaches the most important lesson in acro yoga — alignment and connection. It is low to the ground, requires moderate strength, and builds confidence in both the base and flyer. Once you master this pose, the shape of every other pose becomes clearer.
How to Do It — Step by Step:
For the Base: — Lie flat on your back on a yoga mat with your knees bent, feet flat on the floor. — Raise your feet so your shins are parallel to the ground. — Reach your arms straight up toward the ceiling. — As the flyer steps in, place your hands on their hip bones (the front, bony part of the pelvis — this is the most stable placement). — Bring your feet up to rest on the flyer’s hip flexors — the soft, fleshy area where the thighs meet the torso. — Once connected, slowly straighten your legs and arms together, lifting the flyer off the ground. — Keep your core tight, your legs straight, and breathe steadily.
For the Flyer: — Stand at the base’s feet, facing away from the base’s head. — Lean your hip bones into the base’s hands. — Reach your arms out to the sides (like wings) or keep them by your hips for stability. — As the base lifts, engage your entire body — squeeze your glutes, tighten your core, point your toes. — Look slightly forward and down. Keep your body in one straight line like a plank. — Breathe. Do not hold your breath. Tension without breath creates shakiness.
Key Things to Remember: — The base’s feet must be on the hip flexors, not the belly or ribs — that is painful and unstable. — The flyer must stay rigid — a soft, floppy body is the hardest thing to balance. — Come down slowly and together on a count of three.
Common Mistake: The flyer bending at the hips. Keep your hips, shoulders, and feet in one horizontal plane.
Pose 2 — Star Pose
What It Is: The Star Pose is one of the most iconic and visually stunning beginner acro yoga poses. The flyer stands balanced on the base’s feet, arms wide open, body upright — like a star shining above. This pose is often the first “wow” moment for beginners because it feels magical and looks incredible.
Why Beginners Love It: It does not require the flyer to be inverted or horizontal, which makes it far less intimidating than many other poses. The flyer simply stands — but elevated on another person’s feet. The feeling of standing in the air, supported, is profound.
How to Do It — Step by Step:
For the Base: — Lie on your back with knees bent, feet flat on the ground. — Raise your legs until your shins are perpendicular to the floor. — Flex your feet so the soles are flat and pointing directly upward — this is your platform. — Reach your hands toward the flyer for initial support and balance during entry. — Once the flyer is balanced, you can hold their hands lightly or let go entirely for the full star.
For the Flyer: — Stand facing the base, at their feet. — Place one foot at a time onto the base’s feet (on the heels of the base’s feet, not the toes — heels are stable, toes are not). — Hold the base’s hands as you transfer your weight upward. — Once both feet are planted and your weight is centred, slowly open your arms wide like a star. — Gaze forward. Smile. Breathe. — Keep a micro-bend in your knees for balance — do not lock your knees out completely.
Spotter’s Role: Stand beside the base and flyer, hands near the flyer’s waist, ready to catch if the flyer tips forward or backward.
Key Things to Remember: — The flyer must stand on the base’s heels, not arches or toes. — The base must keep their legs absolutely vertical — not leaning forward or back. — Eye contact between base and flyer helps maintain balance.
Common Mistake: The base letting their legs drift toward their chest. Vertical shins are your foundation — treat them like pillars.
Pose 3 — Bird Pose (Titibhasana / Front Bird)
What It Is: Bird Pose, known in Sanskrit as Titibhasana in its acro yoga variation, is the crown jewel of beginner acro yoga. The flyer balances horizontally above the base — belly down, arms wide, like a bird in flight. The base lies on their back, arms straight up, supporting the flyer’s hip bones with their hands only (no feet involved).
Why It Matters: Bird Pose is the gateway to almost every other advanced acro yoga pose. It teaches the flyer to trust their core and the base to trust their shoulder strength. The feeling for the flyer is pure freedom — like genuinely flying.
How to Do It — Step by Step:
For the Base: — Lie on your back, arms straight up toward the ceiling, palms facing each other. — The flyer steps in to place their hip bones into your hands. — Your grip should be firm but not squeezing — create a shelf with your palms. — Slowly straighten your arms, lifting the flyer into the air. — Squeeze your shoulder blades gently together and engage your core. — Do not lock your elbows rigidly — keep them strong but with the tiniest micro-bend to absorb movement.
For the Flyer: — Stand at the base’s head, facing away from them. — Lean your hip bones back into the base’s hands. — As the base lifts, tip your torso forward — let your chest come down toward horizontal. — Reach your arms out to the sides. — Squeeze your glutes, engage your abs, press your inner thighs together, point your toes. — Your entire back body should feel long and active — not collapsed.
Key Things to Remember: — The base lifts from the palms, not the wrists. Avoid bending the wrist backward excessively. — The flyer’s head should be in line with the spine — neither dropped down nor craned up. — Enter and exit slowly, together.
Common Mistake: The flyer going limp in the air. A Bird Pose with an engaged flyer feels like lifting 20 kg. The same flyer limp feels like lifting 60 kg. Engage your body!
Pose 4 — Shoulder Stand Pose
What It Is: In the Shoulder Stand Pose in acro yoga, the base supports the flyer’s feet from below while the flyer stands tall and upright — but this time the base uses their hands to support the soles of the flyer’s feet from below, with the base lying on their back. It is a standing balance elevated and supported from underneath.
Why It Is Powerful: This pose teaches the flyer extraordinary balance and body awareness while the base develops incredible shoulder stability and focus. It is a quiet, meditative pose once achieved — both partners breathe deeply and find stillness together.
How to Do It — Step by Step:
For the Base: — Lie on your back, arms straight up. — As the flyer steps up, support the soles of their feet with your palms, fingers pointing toward the flyer’s toes. — Lock your arms straight. Your elbows must not bend. — Keep your core engaged and your lower back pressed gently into the mat. — Breathe slowly — your steadiness is the flyer’s safety.
For the Flyer: — Step one foot, then the other, onto the base’s palms. — Hold the base’s ankles or shins for initial balance support as you rise. — Once both feet are planted and the base’s arms are straight, slowly release the grip and rise to standing. — Find your gaze point (drishti) — fix your eyes on one still point to maintain balance. — Bring hands to prayer, or extend them overhead for the full expression.
Spotter’s Role: This pose especially needs a spotter standing directly beside the flyer, hands hovering at waist height.
Key Things to Remember: — The base must keep arms fully extended — bent arms lead to collapse. — The flyer must engage the ankles and press evenly through the entire sole of the foot. — Come down one foot at a time, holding the base’s shins for support on the way down.
Pose 5 — Throne Pose
What It Is: Throne Pose is the most relaxed and accessible of all beginner acro yoga poses — and perhaps the most joyful. The base sits in a supported position and the flyer sits on the base’s knees or thighs, leaning back into the base’s hands for a gentle, supported recline. It looks like a royal throne — hence the name.
Why It Is Perfect for Beginners: Throne Pose requires the least amount of strength and the most amount of trust and communication. It is often used as a warm-up, a cool-down, or a transitional pose. For flyers who are nervous, this pose is the kindest introduction to being elevated and supported.
How to Do It — Step by Step:
For the Base: — Sit cross-legged or with knees bent and feet flat — whatever feels most stable. — The flyer sits on your knees, facing away from you. — Reach your arms under the flyer’s arms from behind and support their back or hold their arms. — You can also lean back slightly and use your legs to cradle the flyer.
For the Flyer: — Sit on the base’s knees with your back against the base’s chest. — Feel the support behind you and let yourself relax. — For a deeper expression, extend your arms out, open your chest, and tilt your head back gently. — Trust the base completely. Let your body go soft. — Breathe deeply. This is the throne — be the royalty.
Key Things to Remember: — Communication is especially important here because the flyer’s back is to the base — you cannot see each other’s faces. — The base should ask “Are you comfortable?” before transitioning. — This pose is excellent for couples, friends, and even parent-child acro yoga.
After Practice — What Every Beginner Must Do
Cool Down Together: Spend 5–10 minutes in a gentle cool-down. The base especially needs to stretch their shoulders, wrists, and lower back. The flyer benefits from deep hip stretches and spinal twists.
Debrief Every Session: Sit together after practice and talk about what worked, what felt shaky, and what you want to improve next time. This debrief builds trust faster than any pose can.
Practice Regularly but Rest Wisely: Acro yoga uses muscle groups you may not have worked intensively before — particularly shoulder stabilizers, hip flexors, and wrist extensors. Practice 2–3 times per week as a beginner and rest in between.
Never Force a Pose: If a pose does not feel right on a particular day — for either the base or the flyer — stop and try something easier. Your ego is not your partner. Your partner is your partner. Honour their limits as you honour your own.
Final Words — Why Acro Yoga Changes Everything
Acro yoga is not just a physical practice. It is a conversation between two bodies. It is learning that strength is not always about pushing harder — sometimes it is about being still enough for someone else to find their balance on you.
Every single pose in this guide — Front Plank, Star, Bird, Shoulder Stand, Throne — can be learned by any healthy beginner within a few weeks of consistent, patient practice. Start slow. Celebrate small wins. Laugh when you fall. Help each other up.
The mat is the safest place to learn the most important lessons — trust, communication, patience, and the extraordinary things that become possible when two people decide to support each other completely.
Begin today. Start low. Stay safe. Fly together.