Yoga has been around for hundreds of centuries, and it is known for toning and strengthening of the muscles of the body along with increasing its flexibility. It handles the stiff hips in numerous ways but most directly via the set of poses that are popularly known as “hip openers”.
Some of these hip openers increase both external or outward as well as rotation of the femur bone present in the hip socket. Other poses lengthen the psoas muscle which is a primary hip flexor that connects both the torso and the legs which gets chronically shortened due to the chair-bound lifestyle of ours.
Pigeon Pose is a quite an extremely effective hip opener which addresses both of these areas and with the front leg works as per the external rotation along with the back leg in particular position in order to stretch the psoas.
Eka Pada Rajakapotasana Basics
| Sanskrit Pronunciation | Eka Pada Rajakapotasana (eh-kuh pah-dah RAH-juh kah-po-TAHS-ah-nuh) |
| Meaning | Eka = one / Pada = foot / Raja = King / Kapota = pigeon asana = pose |
| Pose Type | Seated back-bending pose |
| Pose Level | Advance level pose |
| Style of yoga | Hatha Yoga |
| Other Names | One-Legged King Pigeon Pose, Rajakapotasana, Pigeon King Pose, |
| Stretches | Thighs, groin, back, piriformis, and psoas |
| Strengthening | Lower body |
| Duration | 30 second to 3 minutes |
Meaning
The Eka Pada Rajakapotasana is a Sanskrit word where ‘Eka’ means ‘one’, ‘Pada’ means ‘foot’, ‘raja’ means ‘king’, ‘kapota’ means ‘pigeon’ and ‘asana’ means ‘Pose’. Therefore, this asana is known as King Pigeon Pose.
Rajakapotasana is actually a type of advanced pose, One-Legged King Pigeon Pose which is also known as Eka Pada Rajakapotasana. The two pose poses are quite similar in alignment in the portion of hips and most importantly, an imperative in order to be approached both thoughtfully as well as consciously.
Most of the practitioners understand that this One-Legged King Pigeon is sort of an advanced backbend which requires precise alignment. Yet a lot of people are likely to fold thoughtlessly into the forward-bend Pigeon position that can essentially put a lot of stress on both the knee and the sacrum. In order to avoid injury, it is suggested that the Pigeon is first done first with the variations that will open the hips both gradually as well as safely.
Once the hips are open, one can easily be able to craft a deft and well-balanced Pigeon pose which benefits both the hips and the lower back. In case you practice this pose on a consistent basis, you will essentially notice more ease in the lower half of your body as you sit, as well as walk and stand.
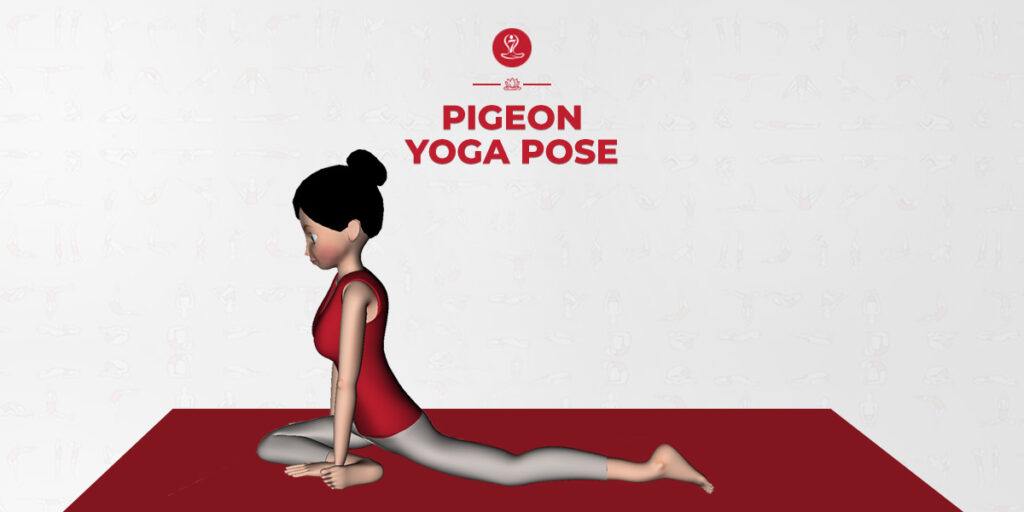
Practice Guide for Eka Pada Rajakapotasana (Pegion Pose)
Eka Pada Rajakapotasana (One-Legged King Pigeon Pose) is a challenging yet rewarding yoga pose that requires careful attention to detail. This guide provides practitioners with a systematic breakdown of the pose, offering clear instructions on body positioning, alignment, and breathing techniques. The inclusion of illustrations or images enhances the learning process, making it an invaluable resource for those seeking to master Pigeon Pose and deepen their yoga practice.
Preparatory Poses
- Triangle Pose (Trikonasana)
- Virasana (Hero Pose)
- Baddha Konasana (Bound Angle Pose)
- Bhujangasana (Cobra Pose)
- Warrior Pose (Virabhadrasana)
Steps to Do Pigeon Pose
Step 1. Threading the Needle

Among the best ways for the opening of the hips and preparing for people is via a supine modification also known as Eye of the needle, that is sometimes called as Dead Pigeon.
This pose is generally for the first-timers and beginners and should be practiced on a regular basis. As one move through this particular pose, along with the next variation, and then moving towards the final pose, he has to make sure that the alternate sides such that the body can easily unfold both evenly as well as progressively.
To start with this, you need to come onto your back along with knees bend and the thighs parallel as well as hip-distance apart.
Next, you need to cross the left ankle over the right thigh while making sure that the anklebone clears the thigh.
Now actively flex the front foot by pulling the toes back. When it is done, the center of the foot will eventually line up with the kneecap instead of curving into a sickle shape that can stress both the ligaments of the ankle as well as the knee.
Now maintaining this particular alignment, you need to pull the right knee in towards the chest, and then thread the left arm through the triangle which is between the legs and clasp of the hands around right leg’s back.
If you can easily hold in front of the shin without any lifting of the shoulders of the floor or upper back rounding, then try to do so or else keep the hands clasped around the hamstring or use a strap. The main goal is to avoid the creation of tension in both the neck and the shoulders as you open the hips, so it is better to choose a position which keeps the upper body relaxed.
As you draw the right leg in towards you while making sure to main toward the right shoulder and not the center of the chest, simultaneously press the left knee away from you.
The particular combination of the actions should be able to provide an ample sensation, but in case you don’t feel much, then try leasing the pubic bone down away from the navel towards the floor.
This will bring a little more curve into the lumbar and also deepen the hip stretch.
Step 2. Boosting The Bird

This particular variation now moves more towards the direction of the ultimate shape but uses the blankets in order to help in maintaining the alignment. Come onto all of your fours with the hands shoulder-distance apart along with an about a hand span in the front of the shoulders.
Now, bring the left knee forward and then place it on the floor so that it is just behind as well as slightly to the left of the left wrist along with the shin on a diagonal as well as left feel should be pointing toward the right frontal hipbone.
Now you need to bring attention to the back leg. The right quadriceps should face the floor such that the leg is in a neutral position ad you wish to avoid the most common pitfall of rotating the back leg extremely.
Now establish this neutral leg by simply tucking the right toes under as well as straighten the right leg such that the high and the knee come off the floor. Left the inner thigh up towards the room’s ceiling and then move the right frontal hipbone square towards the mat’s front.
As you roll the right hipbone forward, draw the left outer back of the hip and in towards the body’s midline. It is a natural tendency which will make you to swing forward and to move out away from you.
When the hipbones of the body are parallel in Pigeon, the sacrum is very much less likely to get torqued, and you can easily practice this particular pose without even putting the strain on your low back. Now maintain this hip alignment and then shimmy the right toes slightly back and then point them such that the high thigh releases the room’s floor. Move the left foot as well as the shin toward the mat’s front and aim for the shin to be parallel to the edge’s front and also flex the foot the way you actually did in the Eye of the Needle in order to protect the knee.
Now observe the left outer hip, In case, after you square the hips, the area where the thigh and the butts meet doesn’t actually rest on the floor then you have to add a blanket underneath.
This is quite crucial in practicing this pose safely. In case the outer hip doesn’t have ample support, the body will eventually fall to the left which makes the hip uneven and distorts the sacrum. Or in case the hips stay square, but the left hip is floating free, then you will be putting too much weight as well as pressure on the front knee. Both of these scenarios are not good.
Step 3. Getting Even

Instead, you need to use the arms for support as you go on organizing the lower body. Adjust in such a way that your hipbone is parallel to the room’s wall that you are currently facing and the scrum is even which means one side hasn’t actually dipped closer to the room’s bottom than the other, and then place, however, a lot of blankets are quite necessary in order to maintain this particular alignment beneath the left outer hip.
Now place the hands on the left shin front and then use the arms in order to keep the torso upright. For the final version, you need to keep moving the left foot forward in order to work to make the left shin parallel to the mat’s front edge. You need to make sure that in doing so, you are maintaining the alignment of the hips and the sacrum while continuing to use blankets in case they deem necessary.
The left leg will be particularly in external rotation, the right leg in neutral with each position giving access to a different form of hip opening. The right leg will then stretch the psoas and also the other hip flexors, and also the left side will get into the particular group of rotators in the butts and the outer hip.
It is quite common to experience a sort of intense sensation in your left hip as your femur rotates outwards in the hip socket. In the case of many people, this is generally in the fleshy part of the butts while for others, it is generally along the inner thigh. Some may feel a stretch along the right hip front as the psoas lengthens. However, you don’t wish to feel any sort of sensations in the left knee. In case you do, then this variation is not suited for you. Return to the Eye of the Needle where you can easily and safely open the hips without causing any strain.
If the knee is sensation free that it is the best thing, extend the torso forward across the left shin and while walking the arms out in your front and then releasing the forehead towards the floor. Now fold forward only when you have spent some considerable amount of time checking the alignment while paying attention to the body.
The left knee will be to the torso’s left along with the left thigh which is on a bit of a diagonal, and the flexed left foot will then be just alongside the rib cage’s right side. As you fold in a forward position, you need to turn the attention inward, it is a common tendency to hold this particular version of Pigeon longer than other more active postures so observe.
if any part of the practice in this particular pose can be to stay mentally focused after you have once settled in. In these extended as well as quieter holds, you will get the idea to explore and tethering you a few moments of scattered attention by simply following the breath as it moves both in as well as out while finding the stillness as you open along with the expansion.
Now, once we have successfully done the Pigeon pose, it is necessary to know the common misalignments in Pigeon pose and to know about how to fix them.
- The first one is when the practitioner dump over the bent leg. In the Pigeon pose, it is quite common for a practitioner to decide that it is vital to bring the thighs all the way downwards to the mat. This is, however, a misconception as it causes most of the hip injuries out of all the most common Pigeon Pose misalignments.
The thighs don’t need to touch the ground. It is quite important that the hips both point forwards. This essentially keeps the weight even on both of the sides such that one doesn’t over-stress the hip’s exterior ligaments opening.
How to fix this issue- In case you find leaning the weight over one leg with the hips pointing somewhere off to one side or the other, then it is recommended that you put a block under the thigh of that particular bent leg. Adjusting in this particular way mean that you can’t bring the forearms or the chest down to the mat and this is particularly fine. You will be safely stretching the right parts in the right and healthy way instead of tweaking an area which should remain strong.
- Lifting the thigs is another misalignment. In King Pigeon Pose, a lot of people focus on touching the toes to the heads’ back that they begin to lift the thigh of the given bent knee up off the ground. However, this action takes the stretch almost clean out of the spinal muscles as well as shoulders and this, in turn, endangers the balance.
How to fix this issue- You have to be able to both enter as well as exit a deep stretch like this particular one slowly in order to keep the strength engaged as well as protect yourself from “pinging down”, just like an elastic band.
- Another misalignment is lax angles. Not flexing the feet to stabilize the ankles is a quite common misalignment in Double Pigeon, Flying Pigeon, and Pigeon on the belly.
How to fix this issue- By flexing the feet protects the ankles from overextending and hence protects the practitioner from lax ligaments and also ankle strains as well as sprains in the future.
- The next misalignment is tense neck as well as shoulders. Specifically, in case of Pigeon on the back, you have to relax the neck as well as shoulders and allow the head to be heavy. Without this particular mild adjustment to the upper body, you may eventually find that you carry some extra tension or soreness in the neck.
How to fix this issue- If it is quite hard for you to relax the head on the mat then you can use a block or a bolster as a pillow. As your head is heavy, you should let the neck take a break from getting held up in the upward position.
- The most common misalignment is the foot under the thigh. This is one that actually makes the Pigeon on the belly even more comfortable. We often feel that our hips are too tight in order to keep into a deeper version rather than we could actually delve into, so we try to tuck the foot on the bent knee under the high and sit on it. This can be highly uncomfortable as well as puts an added pressure.
How to fix this issue- It is better to try placing the weight in the hands on the mat and then move that foot up a few centimeters or inches so that the thighs no longer rests upon it. You may wish to put a block under the thigh or hands or both in order to prop yourself up.
You Can Also, Read – Dhanurasana | Vajrasana | Bakasana | Garudasana | Matsyasana | Ustrasana | Mayurasana
Follow Up pose
- Supta Virasana (Reclined hero pose)
- Ardha Virasana (Reclined Half Hero)
- Ardha Matsyendrasana (Half spinal twist pose)
Benefits of Pigeon Pose
- The criss-cross adjustment of legs can increases the external range of motion of the femur present in the hip socket.
- The regular practice of Eka Pada Rajakapotasana helps in lengthens the hip flexors, this prepares the body for backbends.
- The pose also prepares the body for seater poses like Padmasana or Lotus Pose
- Eka Pada Rajakapotasana stretches the thighs along with gluteals and piriformis muscles.
- The pose helps in the lengthening of the psoas muscles, this increases the range of motion along with the blood circulation in the hip region.
- Pigeon Pose helps in urinary disorder.
- By the regular practice of Eka pada Rajakapotasana, which helps in stimulates the vital organs of the body.
- It improves the posture along with alignment as well as overall suppleness.
- It lessens or alleviates the sciatic pain.
- Pigeon Pose diminishes the lower back pain as well as stiffness.
- It is a primal reaction of the people to store stress, fear, trauma, and anxiety in the hips. These bottled up feelings leads to the creation of tight hips. Pigeon pose helps in opening the hips and helps in releasing negative feelings as well as the undesirable energy that is stored in the system.
Precautions
- To do this asana, a yoga trainer is required, do not do this asana without him.
- To do Kapotasana, keep your stomach empty for 4 to 6 hours and then do this asana.
- This asana should not be done by those who are just starting to do yoga.
- It is necessary to have an empty stomach in Kapotasana yoga asana, hence this asana should be done in the morning.
- Pregnant women should not do Kapotasana yoga.
- If you have pain in your knees then do not do this asana.
- Do this asana comfortably and do not do it in a hurry, otherwise it can be harmful.
Conclusion
One-Legged Pigeon Pose yoga is a Seated back-bending pose that is one of the effective poses for the hip opening poses. The consistent practice of Eka Pada Rajakapotasana helpful in improving the flexibility of the groin and pelvic region, increased blood circulation, stretches the internal organs, and crops of Mental and Emotional values.
Remember to approach Pigeon Pose with patience and caution. It’s normal to stumble while you’re learning, so use a support or a wall for support if necessary.