
If you’re worried about hip pain, yoga may be just what the doctor advised. Practicing yoga for hip pain can help you gain more awareness of your body. At a slow pace, yoga helps to lose fat in the thighs and hips and provides stability in order to reduce hip pain.
Yoga is a mind-body therapy, it is recommended to work on flexibility and core stability, correcting imbalance and alignment issues, and breathing. Yoga improves physical health and relaxes the mind. Especially if you are struggling with hip pain, then flexibility and strength yoga exercises are important. Stretching reduces muscle stiffness and joints are also better. At the same time, strength yoga exercises strengthen the hip and also relieve pain. If an exercise causes pain, do it slowly or do not stretch too much in the event of pain.
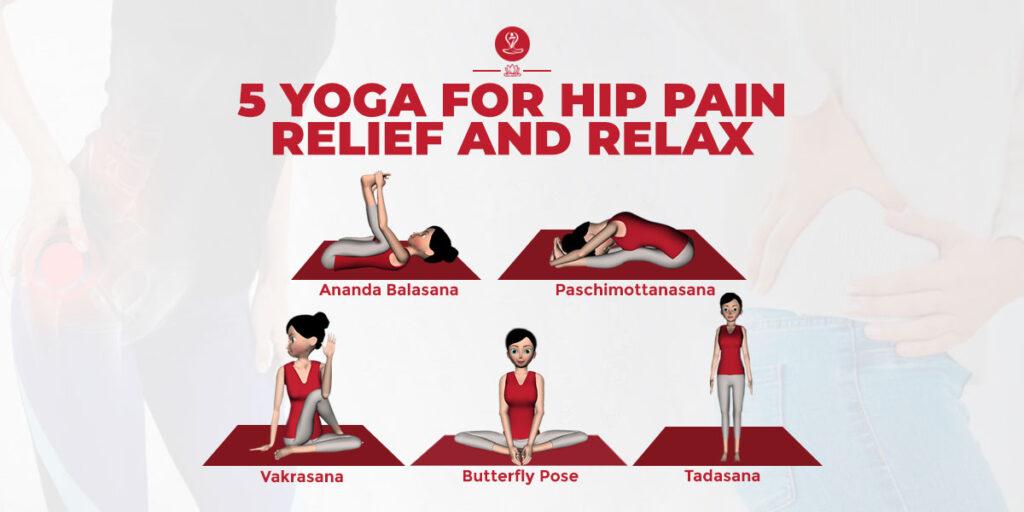
Keep reading to learn more about how yoga poses help relieve hip pain.
Gentle Yoga Poses for Hip Pain Relief
If you’re ready to be free of the pain you’re holding in your hips, keep practice these poses of yoga for hip pain beginners level.
The following five yoga asanas are helpful to stretch and strengthen the muscles in and around the tight hips. Keep practice each pose with mindfulness and precautions.
Mountain Pose / Tadasana
Mountain Pose is an asana that gives your hands and feet a good stretch, which means that it will benefit your hip joint. Body posture improves and pain in the lower part of the hips decrease.
How to do:
- First of all, stand on a yoga mat with the legs and waist straight.
- Take care to keep the heels together.
- In the next step, raise the fingers of the hands by holding them together.
- The palms should be towards the sky.
- Now breathing slowly, lift the ankles up and stand on the feet.
- After this, drag both arms and legs upwards.
- When the body is completely tanned, try to stay in this posture for a while.
- In last, Put the entire weight of your body on the feet.
- Maintain this pose for 2 minutes.
Know more about this asana click here: Tadasana
Butterfly Pose / Titliasana
Butterfly Pose is a very holistic pose that works on your inner parts of the hips and thigh. With this, your back, legs, and thighs will release muscle stress. Apart from this, it will definitely relieve your hips from pain.
How to do:
- First of all, Cross your legs and sit on the mat.
- Keep a distance between the legs in such a way that the toes touch each other.
- Now, place your hands on the feet, holding them together.
- Use your thighs as if a butterfly wing is moving it up and down in motion.
- It can be difficult at first, and you can ease into it gradually.
- It is a fast and easy way to lose fat in the hips and thighs.
Know more about this asana click here: Butterfly Pose
Seated Forward Bend / Paschimottanasana
This yoga exercise of the muscles of the lower back, thighs, and hips gets done. Massage of abdominal and lower abdominal organs and is beneficial for reducing their stress.
Pressing on the hip is also an exercise that targets your hips and thighs. It is the best exercise for people sitting for long periods of time. The pressure on the hips improves the joint of the hip muscles.
How to do:
- Sit on the floor and straighten your legs. Keep in mind that the spine is straight and the toes are pulled towards you.
- Fingers and thumbs pointing to the sky.
- Now move your hands up.
- Bend forward and try to touch the toe with both hands.
- Keep in mind that the feet should not be folded.
- Keep holding the thumb of the feet and try to pull it towards you.
- Now try to raise the head slightly, so that your spine is stretched.
- After this move the navel towards the knee.
- Repeat the above procedure 2-3 times and take a deep breath for 10 seconds by keeping the head down.
- By doing this asana, stretch is felt in the lower back, hip, and legs, which gives relief in hip pain.
Know more about this asana click here: Paschimottanasana
Ananda Balasana / Happy Baby Pose
The happy baby pose is a very beneficial asana to stretch your hips. This is a great hip opener yoga pose. By doing this asana, stretch on the muscles of your hips, which help to reduce the pain of the hips by stimulating them.
How to do:
- To do this asana, first, lie down on your back.
- After this, raise both your legs up and hold the paws of your feet with both your hands.
- Breathe normally while doing this asana. And in this state, you must remain for at least 20 to 30 seconds.
- Now slowly return to normal state.
Know more about this asana click here: Ananda Balasana
Half spinal-twist pose / Vakrasana
Vakarasana is the panacea for the spine. Through Vakrasasan, the spine gets flexibility and our backbone is strengthened. Those who start practicing this asana from a young age, get a lot of benefits in old age. They do not surround the spinal cord, hips pain, back pain, and illnesses.
How to do:
- First of all, sit with spread both your legs forward which means sitting Dandasana.
- Keep both hands on the side.
- Now move your right hand behind your back, which should be parallel to the spine.
- After that turn your neck to the right and look back, as much as you can see back.
- You pull the leg towards you in such a way that there is pressure in the stomach.
- Maintain Yogasana according to yourself.
Know more about this asana click here: Vakrasana
Eka Pada Rajakapotasana / Pigeon Pose
This pose stretches the hip flexors, piriformis, and glute muscles, releasing tension in the hips. It also improve flexibility in the hip joints and surrounding muscles, reducing stiffness and increasing range of motion.
How to do:
- From a tabletop position, bring your right knee forward towards your right wrist, and slide your right foot towards your left wrist.
- Extend your left leg straight back behind you, with the top of your foot resting on the mat.
- Square your hips towards the front of the mat and walk your hands forward, folding over your front leg.
- Hold for 5-10 deep breaths, then switch sides.
Know more about this asana click here: Pigeon Pose
Low Lunge / Anjaneyasana
This pose stretches the hip flexors and quadriceps while also strengthening the legs and core. Also promotes circulation, which can help reduce inflammation and promote healing in the hip area.
How to do:
- From a standing position, step your right foot back into a lunge position, with your left knee directly over your left ankle and your right knee resting on the mat.
- Keep your hands on the mat for support or raise your arms overhead, reaching towards the ceiling.
- Sink your hips down towards the mat, feeling a stretch in the front of your right hip.
- Hold for 5-10 breaths, then switch sides.
Know more about this asana click here: Anjaneyasana
Conclusion
Do not put too much emphasis on your body during practice yoga for hip pain relief. Beginners complete the exercise in less time and gradually increase the time of practice. Understand each step of the yoga practice closely and then apply it.